Physical Address
304 North Cardinal St.
Dorchester Center, MA 02124
Physical Address
304 North Cardinal St.
Dorchester Center, MA 02124
Soldering is an essential skill for anyone working with electronics, especially when it comes to assembling or repairing flight controllers like the AOS 3.5 GEP-F722. Whether you’re a beginner or an experienced hobbyist, mastering the art of soldering can significantly improve the performance and reliability of your projects. In this comprehensive guide, we’ll walk you through everything you need to know about soldering the AOS 3.5 GEP-F722, from understanding the basics to troubleshooting common issues. So, let’s dive in!
The AOS 3.5 GEP-F722 is a powerful flight controller used in drone building and FPV (First-Person View) racing. Like many high-end components, soldering is often required to connect various parts to the flight controller’s PCB (Printed Circuit Board). Knowing how to solder properly ensures a solid, long-lasting connection that will stand up to the vibrations and stresses that drones are subjected to. This guide will give you step-by-step instructions on how to solder the AOS 3.5 GEP-F722 with confidence and ease.
The AOS 3.5 GEP-F722 is a flight controller used in drones. It features the F722 chip, which is known for its powerful processing capabilities, making it a popular choice for drone builders. This controller manages everything from stabilization to flight data processing, ensuring your drone flies smoothly. Its small form factor and high-performance features make it ideal for both casual drone enthusiasts and competitive racers.
Soldering is crucial when working with the AOS 3.5 GEP-F722 because it allows you to connect the components such as motors, power systems, and other peripherals to the PCB. Proper soldering ensures the components are securely connected, allowing for reliable operation and reducing the risk of electrical failures during flight. Improper soldering can lead to cold joints, loose connections, or even short circuits, which can severely affect the performance of your drone.
Before diving into the step-by-step guide, let’s cover some soldering basics that will help you get started.
Soldering is a process of joining two or more metal components together by melting a filler metal (solder) and using it to form a connection. The solder is typically a mix of tin and lead or a lead-free alloy. It is essential in electronics because it creates a reliable electrical connection between components and the PCB.
To perform soldering, you need the right tools. Here’s a list of essential tools you’ll need to work with the AOS 3.5 GEP-F722.
A good-quality soldering iron is essential for heating the solder. You’ll want an iron with a fine tip for precision, especially when working on small components like those on the AOS 3.5 GEP-F722.
Soldering wire is the filler material that melts to form the connection. Lead-based solder is easy to work with, but many hobbyists prefer lead-free solder for environmental and health reasons.
Flux is a chemical compound that helps the solder flow smoothly and improves the bond between the solder and the metal components. It also reduces oxidation during the soldering process.
A soldering stand holds your soldering iron when it’s not in use. It’s important to have a stable, heat-resistant stand to prevent accidents.
Proper preparation is key to successful soldering. Here’s how to get ready.
Make sure you have all your tools ready. This includes your soldering iron, soldering wire, flux, cleaning sponge, and the AOS 3.5 GEP-F722 flight controller.
Set up a clean, well-lit workspace. You’ll need a surface that can handle heat, such as a heat-resistant mat. Ensure the area is free from distractions and has good ventilation, as soldering can produce fumes.
Soldering involves high temperatures, so it’s crucial to take safety precautions. Wear safety glasses to protect your eyes from hot solder or flux fumes. Work in a well-ventilated area, and make sure to keep your workspace tidy to avoid accidents.
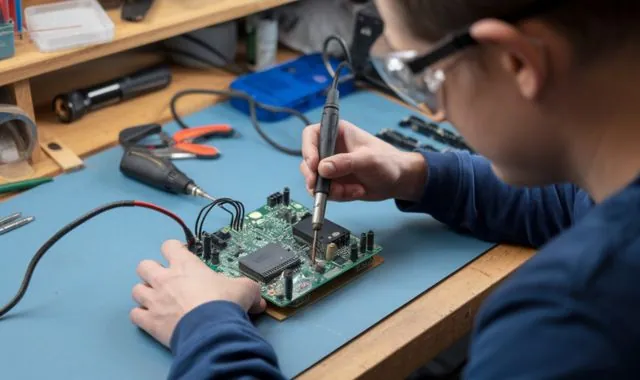
Now, let’s walk through the process of soldering the AOS 3.5 GEP-F722 flight controller.
Before you begin soldering, inspect the PCB for any signs of damage. Make sure the pads (the small copper circles where the components will be soldered) are clean and intact. If necessary, clean the PCB with isopropyl alcohol and a brush to remove any dirt or oils.
Turn on your soldering iron and let it heat up to the ideal temperature, usually around 350°C (662°F). This temperature allows the solder to melt quickly and form a clean connection without damaging the components.
Place a small amount of solder onto the pad. The goal is to create a small pool of solder on the pad, which will help the component pins attach more easily.
Hold the component in place and use the soldering iron to heat both the pad and the component pin. Once the pin is hot enough, apply a small amount of solder. Remove the soldering iron and let the joint cool for a few seconds. The solder should form a smooth, shiny connection.
After soldering all the components, carefully inspect each joint. Look for any cold joints (dull or cracked solder), bridges (excess solder connecting two pads), or loose connections. A good solder joint should be smooth, shiny, and solid.
Once you’ve finished soldering, it’s important to clean any leftover flux residue. You can use a cleaning brush and isopropyl alcohol to remove flux from the PCB, ensuring the board is clean and free from conductive materials.
Even the best soldering techniques can lead to common issues. Here’s how to troubleshoot them:
Cold joints occur when the solder doesn’t fully melt or flow, resulting in a weak or unreliable connection. To fix a cold joint, reheat the joint and add a small amount of solder.
Overheating the components or PCB can cause damage. Always ensure your soldering iron is at the right temperature and avoid holding it on the components for too long.
Solder bridges happen when excess solder connects two pads, causing a short circuit. To fix this, use a soldering braid to wick away the extra solder.
Want to improve your soldering skills? Here are some pro tips:
Too much solder can cause bridges, while too little can result in weak joints. Aim for a small, neat amount that covers the pad and pin but doesn’t spill over.
Keep the tip of your soldering iron clean and tinned. This helps maintain a good connection and prevents oxidation from forming on the tip.
Soldering is a skill that requires patience and practice. Don’t rush the process—take your time to ensure every joint is perfect.
Once you’ve finished soldering, there are a few things you should do to ensure the longevity of your work.
Before using the AOS 3.5 GEP-F722 in a drone, test it to ensure all the connections are solid and functioning properly. Use a multimeter to check for continuity and ensure there are no shorts.
Properly store your soldering tools to prevent damage. Clean the soldering iron tip, store the wire and flux in a dry place, and keep your workspace organized.
Soldering the AOS 3.5 GEP-F722 Soldering flight controller is a manageable task if you take your time and follow the right steps. By understanding the basics, preparing your workspace, and following a step-by-step guide, you can ensure your soldering job is professional and reliable. With practice, you’ll be able to solder like a pro and keep your drone flying smoothly for years to come.
Lead-free solder is recommended for environmental reasons, but lead-based solder is easier to work with for beginners.
Ensure your soldering iron is at the right temperature and don’t rush the process. Reheat the joint if necessary.
Yes, as long as the soldering iron has a fine tip and can reach the required temperature.
A temperature of around 350°C (662°F) is optimal for most soldering jobs.
Use a soldering braid to absorb the excess solder or reheat the joint and carefully remove the solder using a desoldering pump.